Toyota 70 Series Landcruiser Fixes & Solutions:
WHEEL TRACK ISSUE!
The rear wheel track is different to the front on the Toyota 70 series
(2007-2015+), in fact it's 100mm narrower at the rear.
Why is this a problem? When off-roading
in sand the cruiser tends to fish tail and relies on the V8 to push on, this is
particularly not good when climbing sand dunes.
There are two options to correct this:
#1 different offset rims on the
front and rear, 0 offset on the front with a -55 offset on the rear will fix
the problem. This option works best on a70 series tray back Ute.
Rims made which fit the Toyota 70 series cruisers are;
King Wheels Steel Rims 16*8 -55 offset.
King Wheels Steel Rims 16*10 -44
offset.
#2 wheel spacers, these come in two sizes 25mm and a 50mm, these can be sourced at your 4x4 retail stores.
I’m not a big fan of wheel spacers which is why I use different offset rims.
#3 ADR approved TrueTrac correction. With this system you extend the rear axles and this is fully engineered and traffic approved, it is quite expensive however which is why a lot of people go for options 1 & 2.
HIGHWAY REVS ISSUE:
The Toyota 70 Series Landcruiser seems to be lacking a sixth gear, when driving at highway speeds of 100+ the cruiser revs too high in my opinion. 2700 rpm at 110 kph does not seem right and the fuel usage is high, this can however easily be corrected, here's how:
Putting bigger tyres on the cruiser is the best and cheapest way to fix this issue, a 33'inch - 285/75/r16 or a 35'inch - 315/75/r16 will not only fix the rev issue it will also give you more ground clearance.
Best of all the low range gearing
especially 1st gear low is still slow enough for rock crawling!
So many benefits from fixing a problem...
The other option is to fit an aftermarket automatic gear box but this will set you back roughly 20k for the 5 speed auto or 25k for the 6 speed auto box. You do get a nice centre console with it but it’s still 20K+.
Toyota 70 Series Landcruiser Alternator Problem:
The Toyota 70 series alternators are prone to mud in-take and can stop working.
How to fix:
Well option 1 is to keep pulling it apart and cleaning it.
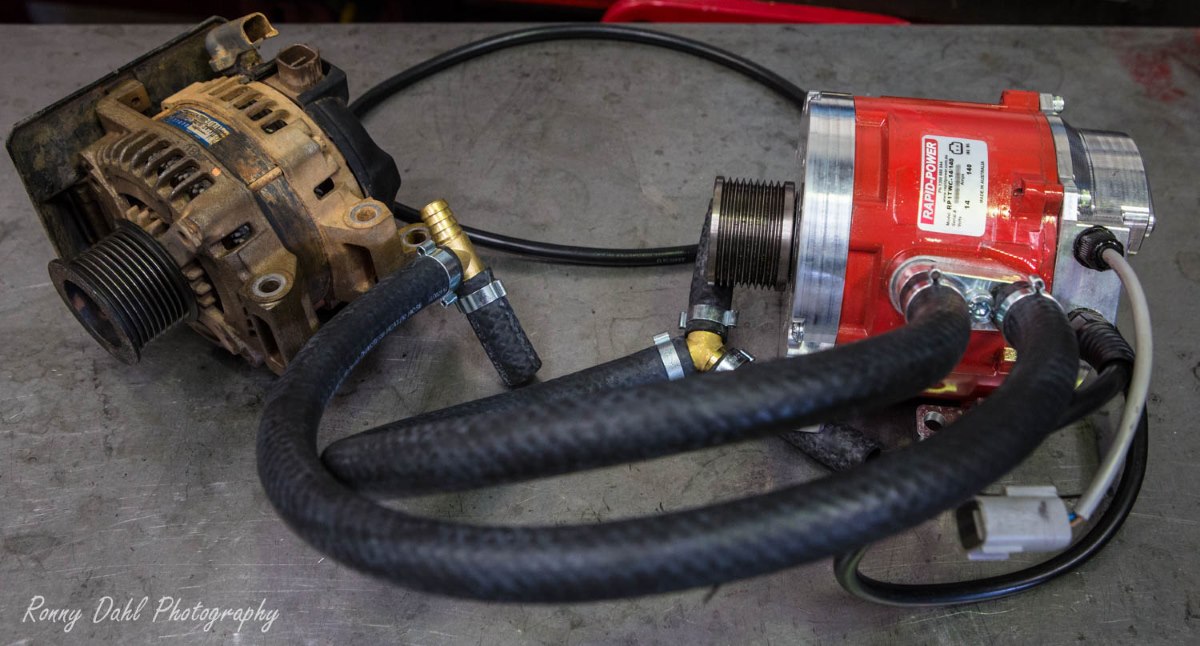
Option 2 is to spend a bit of money and get a 100% sealed unit, see below the cleaning instructions for the Rapid Power Alternator.
Option 1, Cleaning:
This is not the end of the alternator and thankfully there is an easy fix without even removing the alternator, to fix and clean it:
Step 1: simply remove the rear cover from the alternator and use a water bottle with a sports lid to clean it out while brushing it with your trusty tooth brush, assuming you brush your teeth while in the bush. Sometimes it will need a medium sharp tap with a metal bar the get the contacts going again, if this happens flush it again with water afterwards to remove any mud or dirt. Most of the time this will fix it and keep it going.
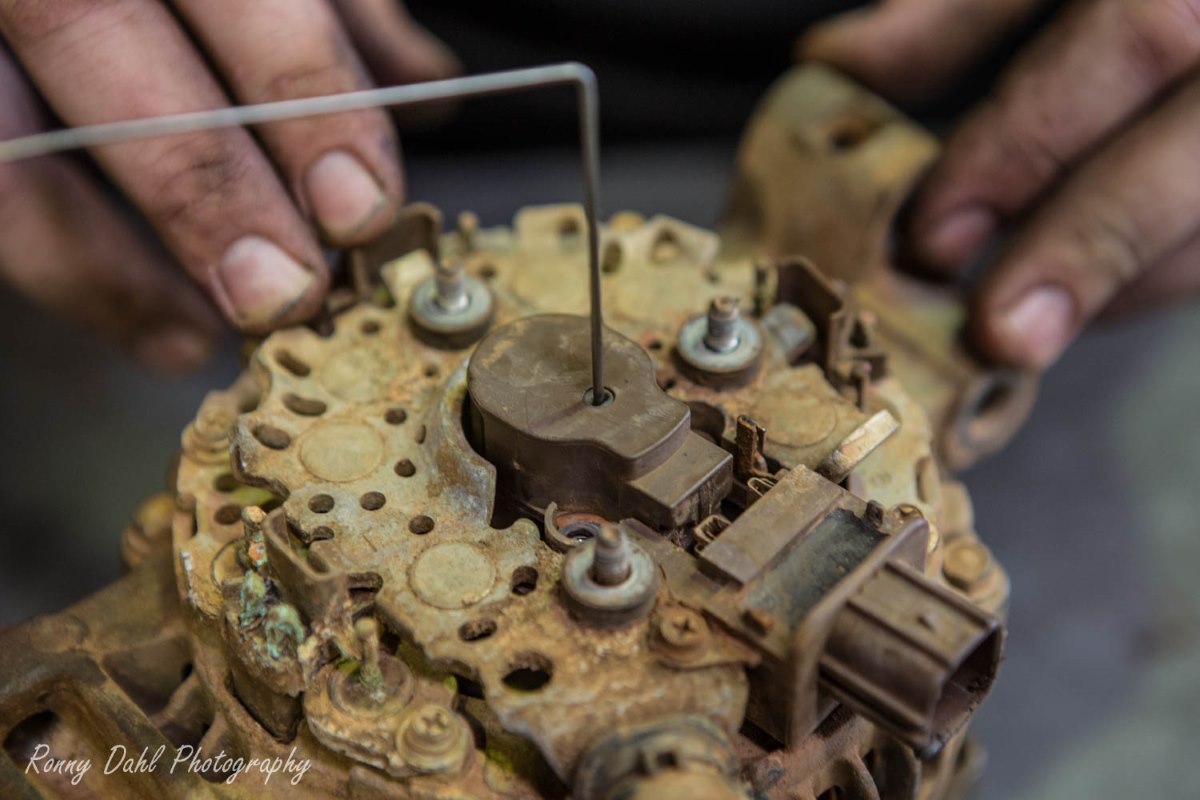
Step 2 (if step one didn’t work): This is a bit of a pain with the alternator still mounted but you can remove the brush cap/housing to directly clean the contacts and brushes.
To get to this there are 2 more screws to loosen which are on either side of the brown keyhole shaped cap in the middle of the alternator. Once the screws are removed pull the cap off and clean both the brushes and the contacts with water followed by electrical (or WD40 if that’s all you got).
To put it back together you will need a bit of wire (tie wire) to insert into the pin-hole on the back of the cap. Without this you won’t be able to reinstall the brushes.
Poking the wire into the hole will release the brushes so which will allow you to put the Brush cap back on.
Step 3: start the cruiser and watch the battery light, if it’s gone then you can high five yourself and put the covers back on but if the battery light is still on I’m afraid you alternator is STUFFED!
Still need to remove it? Then you will need a 14mm socket to lever the auto tensioner, if you are not sure from here on it’s a bit too hard to explain without a video which will be coming in the near future.
If the above doesn’t work then it may be time for a new alternator. If travelling remote areas pack a spare just in case.
Option 2 below:
The Ultimate Alternator fix for The Toyota 70 Series Landcruiser:
Alternator upgrade:
I recently upgrade my alternator from the factory Toyota to Rapid Power water cooled alternator which was supplied and installed by my trusty mechanic Travis at DPD, Perth Diesel Performance. DPD is the WA agent for these water cooled alternators.
So why the upgrade? Well if you own a VDJ70 Landcruiser and have gone through a fair share of mud you will be familiar with the issues at hand. Which is alternator failure due to it being mounted so low in the engine bay. Mud and dust collects around and inside the unit, there is no way of protecting it where it is mounted.
There are other options on
the market, one of which is a coated alternator used in underground mines
however once covered and drowned in mud they will inevitably suffer the same
fate as the factory units.
The water cooled version is very expensive but like all things you get what you pay for, this unit is 100% sealed and taps into the engine coolant system.
I have had to clean mine out twice and have been experiencing volt drops since, being the lead vehicle on our trips it's super important that my cruiser is unbreakable, hence the reason for my purchase.
Now with this new unit I’m back at 13.99 volts at full charge.
Once tested in the field I will do a review on the on the Rapid Power Alternator.
If you would like more details on this Alternator please contact PDP.
Or To Purchase The Sealed Alternator Online Click Here.
A few more handy tips for the Toyota 70 Series:
- The Toyota VDJ70 is mainly bolted together with 10mm, 12mm and 14mm nuts and bolts which are bloody great as you can reduce the size of the tool box you need to carry! You can almost pull the entire vehicle apart with just those sizes, just remember to add a 22mm for the wheel nuts.
- If you have just purchased a GXL new or used with the factory alloy rims you can sell these for around $2500-$3000 (if in perfect condition) for the set of 5, this will almost pay for 5-6 steel rims with 33inch tyres. A great way to upgrade.
TOYOTA 70 SERIES LANDCRUISER SNORKEL, NEED TO KNOW!:
I wouldn't trust the snorkel that comes with the Landcruiser as its just a raised air intake. For more details watch this video.
Getting more from you under powered VDJ70 engine:
As most other Toyota’s and some other vehicles when they are released from factory they are very under powered which is also why they are so reliable, but there is plenty of ‘safe’ power gains to have from your Toyota 70 series diesel motor.
With the correct power/torque chips (in my case the Unichip Q4) and the right person to ‘LIVE’ tune it on an actual dyno, there is so much locked power, torque to gain. Not only that the engine temperatures, fuel consumption and drivability is dramatically improved.
For Information About The Unichip Q In The LandCruiser See Here.
Carrying Extra weight & brakes fix:
If you own the 79 single cab or the dual cab and have a canopy on the rear you will more than likely be carrying a lot of weight causing sag at the rear. I have found the best way to fix this is installing airbags to the rear and run them with 10-20psi.
So far I have not felt or noticed a difference in wheel travel and flex off-road so don’t let those stories or thoughts stop you from installing the airbags. What I have found is the cruiser handles corners and bends on the highway far better than before when loaded up.
Now to the rear brakes fix, when you lift the suspension on these Toyota 70 series landcruisers what is often over looked is the rear brake gaugeing cable which needs to be lifted the same as the change in suspension height. Without that the brakes are very slow and none responsive. A simple bracket to lift the cable gauge will fix this issue costing not that much.
Thanks for reading,
Cheers Ronny,
A self-proclaimed Landcruiser and off-road nut!
Thanks to the following sponsors who have helped and been involved with my Toyota 79 series Landcruiser:
Perth Diesel Performance (unichip perth agent)
Recent Articles
-
Goodyear wrangler MTR
Jun 28, 24 10:27 PM
I have these on my defender 90 and my Dmax Ute. I get around 100,000 km out of them. I tried AT for one change and went back to the MTs. They are gol -
4x4 off road tracks 0 to 250 km from Perth
Nov 21, 23 07:40 PM
On this page we cover 4x4 off road tracks within a 250 km radius from Perth... -
4 Wheeling Around Jurien Bay.
Nov 21, 23 07:35 PM
Jurien Bay 4x4 tracks info and general information about the area...
- Home
- The 79 Series LandCruiser.
- Toyota 70 Series
Leave The Toyota 70 Series And Go 4-Wheeling-In-Western-Australia.
